Tuesday, November 29, 2016

Big savings every hour, today only

Today only, Nov 30, 2016, from 10am until midnight US Eastern Time, you can get a new Silver Subscription at significant savings (one month subscription not included). The amount you save changes from one hour to the next. Here are the promo codes for each hour:
  • from 10am to 10:59am -> ELASTIC10
  • from 11am to 10:59am -> ELASTIC11
  • from 12pm to 10:59am -> ELASTIC12
  • from 1pm to 1:59pm -> ELASTIC13
  • from 2pm to 2:59pm -> ELASTIC14
  • from 3pm to 3:59pm -> ELASTIC15
  • from 4pm to 4:59pm -> ELASTIC16
  • from 5pm to 5:59pm -> ELASTIC17
  • from 6pm to 6:59pm -> ELASTIC18
  • from 7pm to 7:59pm -> ELASTIC19
  • from 8pm to 8:59pm -> ELASTIC20
  • from 9pm to 9:59pm -> ELASTIC21
  • from 10pm to 10:59pm -> ELASTIC22
  • from 11pm to 11:59pm -> ELASTIC23
There's no particular pattern, the savings for each hour are random so if the price looks right to you don't wait. IMPORTANT: The discount applies to new subscriptions only. The 1 month subscription is not included.

Tuesday, November 22, 2016

Comparing and synchronizing Oracle databases

Applies to: xSQL Oracle Data Compare v1.0 - 2.0

As you may have noticed, most of the articles in this blog focus around scenarios and solutions for databases in Microsoft's SQL Server. However, most of the experienced DBA's in the field of information technology and data sciences have probably dealt with more than one database engine. Anyone working in big enterprises certainly knows of Oracle's database engines (12c being their latest version). According to DB-Engines' ranking, Oracle's databases have the number one spot in the popularity ranking of major database engines with 1413.01 points. Having said this, I felt that it was high time I posted an article that provides some insight into data synchronization in Oracle databases.
Without further ado, let's see how to perform a data comparison and synchronization with xSQL Oracle Data Compare. In this demo I have used the sample HR schema that can be found in this Git repository. I created two databases (orcl and orcl2) and added the HR schema in both. Then, I deleted all the data from the COUNTRIES table in orcl2.
The first thing you do is add the databases. For those of you who are used to xSQL Data Compare for SQL Server, you will notice that the dialog is a bit different:

In the Connection Name, you can specify any name you like to identify the connection with. Personally, I like to keep the Connection Name the same as the Service Name (which is basically the same as Database name in SQL Server). But this will work with any type of string, as long as you type the Service Name correctly. Then you specify the username (Schema name) and the password for that user. In the Host Name and Port fields enter the server name and service's port number on that server. After adding the databases, the comparison and synchronization process is more or less the same as in xSQL Data Compare for SQL Server:

  1. You click on Compare Schemas and choose the databases and schemas you would like to compare. For the schema selection, just leave the '<default>' option selected and xSQL Data Compare will automatically retrieve the tables associated with the user specified when the connection was added. The following tables from the HR schemas in both databases are mapped together.
  2. After the objects are analyzed and mapped together, you can perform the comparison by clicking on 'Compare Data'. Before you do this, you can also edit the comparison and scripting options to customize the comparison process by specifying for example, whether Views should be compared, or if the character case should be ignored in text columns. Apart from this you can also define some simple mapping rules to ignore table name prefixes or suffixes. The comparison result below shows that the COUNTRIES and LOCATIONS tables are different in both databases (LOCATIONS table is different because it contains a foreign key to the COUNTRIES table whose values I set to null in order to delete all the records from the COUNTRIES table).
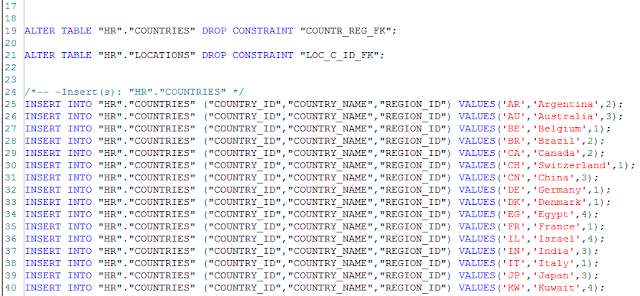
  3. Now, all that is left is to generate the synchronization script for the left database (which is orcl2) and execute it so that the synchronization process is completed. Here is a screen shot of the script:

And there you have it, a complete data synchronization process for two Oracle databases. This is a very basic scenario, but I hope it provides the knowledge needed to perform more complex data comparison and synchronization tasks. You can check out the online documentation to learn how to use xSQL Oracle Data Compare's features complex synchronization tasks.


Thursday, November 17, 2016

How to convert a vertical list to a horizontal one in SQL

*Originally published in our old blog on August 12,  2011

Let's say you have a table that looks something like this:

CREATE TABLE [Source_Vertical](
 [ID] [int] IDENTITY(1,1) NOT NULL,
 [GroupID] [int] NOT NULL,
 [Col1_Group] [varchar](50) NULL,
 [Col2_Group] [varchar](50) NULL,
 [Col1_Individual] [varchar](50) NULL,
 [Col2_Individual] [varchar](50) NULL)

You don't know how many rows there are for each GroupID and your job is to generate a list that contains all values associated with a given GroupID in a single row. Here is a simple way to do it:

First: create a target table that looks something like this:

CREATE TABLE [Target_Horizontal](
 [GroupID] [int] NOT NULL,
 [GroupValues] [varchar](max) NULL)

Second: copy, adjust based on your needs, and execute the following simple script (note I used a vertical line as a value separator - you can use whatever you need, just make sure the character you choose as a separator does not exist inside the actual values of the columns):

DECLARE @GroupID int
DECLARE @GroupID_Current int
DECLARE @Col1_Group varchar(50)
DECLARE @Col2_Group varchar(50)
DECLARE @Col1_Individual varchar(50)
DECLARE @Col2_Individual varchar(50)
DECLARE list_cursor CURSOR
    FOR SELECT * FROM dbo.Source_Vertical ORDER BY GroupID
OPEN list_cursor
FETCH NEXT FROM list_cursor INTO 
 @GroupID,
 @Col1_Group,
 @Col2_Group,
 @Col1_Individual,
 @Col2_Individual
 SET @GroupID_Current = ''
WHILE @@FETCH_STATUS = 0
 BEGIN
 
  IF @GroupID_Current <> @GroupID
   BEGIN
    INSERT INTO Target_Horizontal (Id, GroupValues) VALUES(@GroupID, @Col1_Group + '|' + @Col2_Group + '|' + @Col1_Individual + '|' + @Col2_Individual)
    SET @GroupID_Current = @GroupID
   END
  ELSE
   BEGIN
    UPDATE Target_Horizontal SET GroupValues = GroupValues + '|' + @Col1_Individual + '|' + @Col2_Individual WHERE GroupID = @GroupID
   END
 
  FETCH NEXT FROM list_cursor INTO 
   @GroupID,
   @Col1_Group,
   @Col2_Group,
   @Col1_Individual,
   @Col2_Individual
 END
CLOSE list_cursor;
DEALLOCATE list_cursor;

Finally, you can take the results from the target table and dump them onto Excel or wherever you need to.

Wednesday, November 16, 2016

SQL Jobs on a Mirrored Environment

* originally published on our old blog in January 4, 2012
One of the little challenges a DBA has to deal with when setting up SQL Server mirroring is the handling of SQL Server jobs. SQL Server mirroring works at the database level so SQL Server instance level objects are not mirrored. To achieve a transparent fail-over some of those instance level objects, like certain SQL Jobs related to your mirrored databases, need to be somehow "mirrored" as well. The objective is simple: any relevant jobs that were running on the principal, on fail-over should start running on the mirror. So we have to make sure the jobs are kept in sync and are activated at the right moment (you don't want those jobs to be running on the mirror until the fail-over happens).

One approach would be to have scheduled jobs that periodically syncs the SQL Jobs on the principal with those on the mirror and periodically checks the mirroring status to determine if the jobs on the mirror need to be activated.

Another simpler approach would be to use multi-server jobs. You can use a third server, like the witness for example, as the job "master" and do the following:
  1. All the jobs that must be "mirrored" should be created on the job "master" server as multi-server jobs. 
  2. The target for those jobs is set to be the principal 
  3. Create a job on the job master server that checks the mirror status, let's say every minute
  4. If a fail-over has happened and the mirror has become the principal then it changes the target server for those jobs.
Here is a simple stored procedure that checks the mirroring status and switches the target server for those jobs.

CREATE PROCEDURE [dbo].[usp_ChangeJobTarget] 
  @DBName varchar(256) = 'MyMirroredDB',
  @Principal varchar(256) = 'MyPrincipal',
  @Mirror varchar(256) = 'MyMirror'
AS
BEGIN
  SET NOCOUNT ON;
  DECLARE @current_principal varchar(256)
  DECLARE @principalID int
  DECLARE @mirrorID int
  DECLARE @jobname  varchar(256)
   SELECT @current_principal = principal_server_name FROM sys.database_mirroring_witnesses WHERE database_name = @DBName
   SELECT @principalID = server_id from msdb.dbo.systargetservers WHERE server_name = @Principal
   SELECT @mirrorID = server_id from msdb.dbo.systargetservers WHERE server_name = @Mirror
 IF @current_principal like @Mirror
   BEGIN
    -- principal has changed so we need to change the target for all jobs
    -- first let's get the complete list of jobs that target the principal
   DECLARE @JobList TABLE
    (
      [JobName] [varchar](256) NOT NULL,
      [Changed] bit NOT NULL
    )
    INSERT INTO @JobList
      SELECT [name], 0
         FROM msdb.dbo.sysjobs as a INNER JOIN msdb.dbo.sysjobservers as b on a.job_id = b.job_id
         WHERE b.server_id = @principalID 
    -- now for each job on the @JobList we need to change the target from principal to mirror
      SELECT TOP 1 @jobname = [JobName] FROM @JobList WHERE [Changed] = 0 
         WHILE (@jobname IS NOT NULL)
           BEGIN
              exec msdb.dbo.sp_delete_jobserver @job_name = @jobname, @server_name = @Principal
              exec msdb.dbo.sp_add_jobserver @job_name = @jobname, @server_name = @Mirror
              UPDATE @JobList SET [Changed] = 1 WHERE [JobName] = @jobname
              SET @jobname = null
              SELECT TOP 1 @jobname = [JobName] FROM @JobList WHERE [Changed] = 0 
           END 
     END
  END
GO

A couple of notes to keep in mind:
  1. There is a small delay on replicating a multi-server job. In other words, if you change a job or add a new job on the job master server it will take up to a minute for those changes to be reflected on the target server(s). 
  2. The above stored procedure only goes in one direction – changes the target from principal to mirror in case of fail-over. You will need to adjust it to make it work both ways – one simple way to accomplish this is to simply compare the current principal with the target for those jobs and if they don’t match then change the target.
  3. The above script is provided as is - use at your own risk.
Last but not least: check out our SQL Server comparison and synchronization tools, xSQL Schema Compare and xSQL Data Compare they will make your database deployment a breeze. Also, check out our free Script Executor - no other tool in the market today comes close to it.

Monday, November 14, 2016

Customizing mapping in database synchronization

As a DBA doing data comparison and synchronization in databases, you would think that most of your tasks will be on databases that are exactly alike (schema-wise), because why bother placing the same data in two databases that are different right? Well, there are some exceptions in which these databases will have slight differences. For example, you might have two databases, one that stores the live data and one that stores the quality assurance data, in two different servers. Normally you assume that these databases will have the same tables and schemas with exactly the same names. However, there are cases (like mine), in which this is not the preferable option. I, for example, prefer to have some naming convention that would, by looking at the tables or schemas, clearly indicate in which database I’m in, just in case my brain freezes and I start making changes to the live database thinking it’s the quality assurance one. One such convention might be adding a prefix or suffix to the tables or schemas. How do you go about doing the synchronization process in these cases? Let’s look at an example with such synchronization done with xSQL Data Compare.

I have 2 databases:
  • AdventureWorks2012 which will be in the role of the live database. This table has five main schemas: HumanResources, Person, Production, Purchasing and Sales.
  • AdventureWorks2014 which will be in the role of the QA database and as such, all the schema names have the ‘QA_’ prefix.
If the comparison is run with the default mappings, xSQL Data compare will not be able to match any of the objects in the 5 schemas mentioned, because technically, these schemas do not exist in AdventureWorks2014. So here are the objects that would be compared with the default mappings.


As you can see, none of the objects in the 5 schemas in AdventureWorks2012 is listed here. Thankfully, xSQL Data Compare allows for customization of object mappings. This can be done by opening the mapping rules window, which looks like this:


In the first tab you can specify how the schemas are mapped. By default, xSQL Data Compare matches exact schema names. The second option is to ignore the schema name, which will mean that tables with the same name in different schemas will be mapped together. For databases with multiple schemas this has a very high chance of throwing exceptions, but if the databases being compared have only one schema and its name is different in both databases ignoring the schema name is a very quick way to eliminate the different names problem. Lastly, you can choose to manually specify the schema pairs that will be mapped by selecting two schemas in the ‘Unmapped schemas’ section and clicking on ‘Map selected schemas’. In this case I have manually chosen to map every schema in AdventureWorks2012 with its equivalent in AdventureWorks2014. Here are the schemas listed in the ‘Mapped Schemas’ section:


Before I show the results of this configuration, let me explain what can be configured in the other tabs in the ‘Mapping Rules’ dialog. The second tab, ‘Name mapping rules’ allows you to specify prefixes or suffixes to be ignored in table names. This isn’t covered in this example but to quickly explain it, if you have a development database on the right and a production database on the left whose table names have the ‘_dev’ and ‘_prod’ suffixes respectively, in this tab, you can tell xSQL Data Compare to ignore these suffixes so that tables like ‘Employees_dev’ and ‘Employees_prod’ will be mapped together.

The third tab customizes how columns are mapped according to their data types. By default, columns need to have the same data type to be mapped together. This excludes character types which can be either the UNICODE or the ASCII variant (e.g NVARCHAR and VARCHAR will still be mapped together). However, you can specify the more lenient option of mapping data types by compatibility because some data types are compatible with more than one data type. For example, the DATETIME data type is compatible with DATETIME (obviously), DATETIME2 and SMALLDATETIME. If this option is chosen and a column has a DATETIME data type in one database and a SMALLDATETIME data type in the other, they will still be mapped, whereas by default they would not have been mapped.  

Now, to show the results of the specified schema mapping rules


As you can see, the tables in the schemas (Production and QA_Production in this photo) are mapped together and will be compared and synchronized.

This is all well and good, but what if you want to map tables with entirely different names? If you have for example, two databases that have a table with data about the products of a company, but in one database this table is called ‘Products’ and in the other it is called ‘Articles’, ignoring prefixes or suffixes can’t really do the trick. In this case you can either choose to "compare tables/views" option which allows you to manually map the tables/views, or you can use the command line version. The GUI option is obvious and does not need much explaining, whereas the command line option is a bit more involved, In the xml configuration file that xSQL Data Compare Command Line utility can receive as an argument you can specify a custom table mapping schema and then, specify the table pairs, one by one. This will give you the freedom to map together any two tables. Of course, they have to have the same columns in order to successfully be compared and synchronized.

Here is the XML code to map together ‘Products’ and ‘Articles’ tables.

<CommandLineOptions>
    <TableMappingSchema>Custom</TableMappingSchema>
</CommandLineOptions>
<TablePairs>
    <Pair>
        <LeftObject Name="dbo.Products"></LeftObject>
        <RightObject Name="dbo.Articles"></RightObject>
    </Pair>
</TablePairs>


In conclusion, I hope to have provided a demo that will be of some help to all those DBAs or developers that have come across the scenarios mentioned in this article while comparing and synchronizing databases with tools such as xSQL Data Compare.

Friday, November 11, 2016

How to deploy your SQL Server database to a remote server

CASE 1: you have direct access to both the SQL Server where the source database is and the SQL Server where the target database is.

  1. First time deployment
    1. Backup / restore method
      1. Backup the database on the source
      2. Copy the backup file to the target machine
      3. Restore the database on the target
      4. Create logins and set permissions as needed
    2. Compare and Synchronize method
      1. Create database on the target machine (blank)
      2. Use xSQL Schema Compare to compare and synchronize the database schemas of the source and the target. 
      3. Use xSQL Data Compare to populate the remote database with whatever data you might have on the source that you want to publish (lookup tables etc.)
  2. Database exists in the target server
    1. Compare and Synchronize method
      1. Use xSQL Schema Compare to compare and synchronize the database schemas of the source and the target. 
      2. Use xSQL Data Compare to push any data you need from the source to the target. Caution: be careful not to affect any data that exists on the target already.
CASE 2: You can not directly access the target server but you have a way to deploy SQL scripts on that server. As is indeed the case in most scenarios you also should have a way to get a backup of your database from that remote host. In this case follow those simple steps:

  1. Restore the remote database on your local environment
  2. Use xSQL Schema Compare to compare your source database with the restored database. Generate the schema synchronization script and save it.
  3. Use xSQL Data Compare to compare your source database with the restored database. Carefully make your selections to ensure you push only the data you want to push from the source to the target. Generate the data synchronization script and save it. 
  4. Deploy your schema synchronization script to the target machine. 
  5. Deploy your data synchronization script to the target machine.

Both xSQL Schema Compare and xSQL Data Compare are completely free for SQL Server Express with no restrictions or limitations. Furthermore, for other editions of SQL Server the tools are free if the database has under a certain number of objects in it (current limitations are listed here).

Monday, November 7, 2016

Comparing xSQL Schema Snapshots

Applies to: xSQL Schema Compare v7.0.0 – 9.0.2

Before I develop a scenario where xSQL Schema Compare snapshot comparison is necessary let’s explain what xSQL Schema snapshots are. An xSQL Schema snapshot is a compact file that contains all the schema information for a database. In simple words, an xSQL Schema snapshot is basically a picture of a database’s schema at a specific moment in time. These snapshots are very useful if you want to keep track and get a clear picture of the evolution of a database, by comparing the snapshots with each other or with the live database.

Scenario: Naturally, the question that arises is “Where and how would one use this feature?”. Let’s, for the purpose of this article, take the place of a software developer in a relatively big company. In most cases the development department is separate from data management which means that developers do not have any access to the live databases because these databases are managed by entirely different persons. So how would the developer go about updating the live database with the schema changes made in the development database after the development of a new feature is completed? Direct database comparison is not possible because no party has access to both databases. Simply sending an email to the DBA with the changes you need to be made is out the question because it’s error prone and for anything more than very minor changes, it is not feasible.

Solution: Use snapshots! Ideally, the DBA who manages the live database would create a simple job that periodically takes a schema snapshot of the live database and dumps it into a shared repository to which the developers have access. These snapshots would then be used by the developers for auditing and debugging purposes. In this case, you can use these snapshots to compare the development database with a snapshot of the live database, generate the synchronization script and send it to the DBA to execute it on the database. Let’s see how this is done.

For demonstration purposes I created a copy of the Northwind database and took a snapshot of the copy with xSQL Schema Compare. This copy will serve as the live database. Then I added a column on one of the tables in the original database which will serve as the development database. The picture below shows the snapshot in xSQL Schema Compare:


The comparison process for databases and snapshots is exactly the same. For the left database I am using the NORTHWND which has the extra column and instead of the right database I added the snapshot.


After choosing the database and the snapshot, I ran the comparison and xSQL Schema Compare found the difference in the ‘Categories’ table, for which, the left database has one additional column.


If I generate the synchronization script for the right database, it will generate this SQL Statement:


So, at this moment, I as a developer, have the synchronization script which I can send to the DBA and let him/her make the change to the live database represented in this demo by NorthwindCopy. And all of this was done without needing to access the database from which the snapshot was taken.

In conclusion, besides this scenario, xSQL Schema Compare’s snapshots can be used to stimulate a very basic version control for the database’s schema. For example, if you as a developer are not sure, which is the best database construct for a new feature you are about to implement, you can take a snapshot of the database, make the changes you need to do to test the database construct for that new feature, and if something does not work the way it should, you can always roll back these changes by synchronizing the database with the snapshot. 

Friday, November 4, 2016

Get a Free 1 Year Silver Subscription (normally $299) if you can – fun promo

[Promo has expired ] 
Today only (check the post date), you can get a free 1 year Silver Subscription, normally $299, but you will have to work for it. PLEASE DO NOT PUBLISH THE CODE ONCE YOU FIND IT – DON’T RUIN THE FUN FOR EVERYONE! If we find that the code has been published we will immediately terminate the promotion.

Here is what you will have to do: visit the page of the each of the 8 tools listed on the top of the right hand panel on this blog (under the heading "Download Our Tools") in the order that they appear there. From each product's page pick the first letter from the third line in the "Highlights" section. Perform a "Bitwise Exclusive OR" operation between the Ascii values of each of the letters you picked (the letters have to be in order) - the number you get from that operation (the binary number) is the code you can use to get a 1 year Silver Subscription license for $0
Once you find the code then do the following:

  • Go to the Silver Subscription page
  • Select SN1Y-1L1U (Single-User, 1-Year License)
  • On the shopping cart page plug in the discount code that you identified above and click on "Apply Discount" - that will subtract the full $299 from the price 
  • Proceed with the checkout to obtain your license. 

Rules:

  • One license per customer.
  • Licenses cannot be resold or transferred.
  • Do not publish the code - any licenses obtained by individuals that did not visit each of the 8 product pages above will be invalidated. 
  • The deal expires on 11:59 PM EST on October 4, 2016

Post any comments and/or suggestions here please - we will respond as promptly as we can.

Thursday, November 3, 2016

SQL Data Compare Command Line Wizard - Automate Data synchronization in minutes


xSQL Data Compare V9 comes with a Data Compare Command Line Wizard that makes automating the data synchronization process a breeze:

  1. Run the xSQL Data Compare Command Line Wizard which you will find under All Programs / xSQL Software;
  2. Follow the intuitive configuration steps to completion (you will end up with an xml config file); You can choose whether the database synchronization script will be executed or not. 
  3. Create a simple batch file that calls "xSQLDataCmd.exe YourXMLConfi,xml" and does whatever else you might need it to do like archiving old sync scripts etc. 
  4. Schedule a job that executes the batch file daily or however often you might want to. 

What do you need this for? There are multiple scenarios where this would come in handy:
- synchronizing your web database with your internal databases, like updating inventories, updating orders, updating order status, updating customer lists etc.
- synchronizing your branch office databases with your central repository;
- restoring a particular table or column(s) in case of a mishap.
- etc.

Best of all: the xSQL Data Compare is completely free for SQL Server Express, no strings attached. That may change in the future but for now enjoy using it!

Wednesday, November 2, 2016

Why is SQL Server scanning the clustered index when I have an index on the column I am filtering on?

*Originally published in our old blog on January 2009

I ran into a very simple SQL Server performance related question the other day. A puzzled DBA was staring at a simple query “SELECT * FROM table1 WHERE col_n = x”. Since this was a fairly common query that was executed very frequently he had appropriately created an index on col_n. Yet, for some reason SQL Server was simply ignoring the index on col_n and instead scanning the clustered index. So the puzzling question on this DBAs mind was “why is SQL Server scanning the table? Isn’t the SQL Server Query Optimizer smart enough to see that it will be more efficient to use the col_n index?

The answer lies in the fact that the SQL Server Query Optimizer is smarter than that (albeit not as smart as I wish it would be). You see, when deciding on a particular execution plan the Query Optimizer has to use an actual value for the parameter x to estimate the number of rows that will be returned on each step. It further assumes that the rows you are looking for are randomly distributed and that it will need to do a page read for every row being returned in addition of the reads it needs to do on the index pages. Depending on this number it makes a determination whether it will be more efficient to just scan the whole table and pull out the rows it needs or go to the col_n index first to get a list of addresses and then go and pull those rows.

So, now that we know why should we just leave it there since it appears that SQL Server is correctly picking the most efficient path? Not so fast! Remember all that evaluation is being done based on a certain value of parameter x. It could be that for most of the values of parameter x scanning the table is more efficient. In that case you can simply drop the index on col_n if it is not needed for any other queries and leave it at that. However, it could be that for 99% of the possible values of x it would be a lot more efficient to utilize the col_n index – it just so happened that unfortunately when generating the plan the value of x happened to fall on that 1% for which scanning is more efficient. In this case you have two options:
  • simply force SQL Server to dispose the bad plan that it has cashed and generate a new one; OR
  • use a HINT to force SQL Server to use the index. The danger with this however is that with time as the data changes the use of that index may not be optimal so I would recommend that you avoid using HINTS whenever possible and let SQL Server do its job.


One last note: it is often not necessary to return all the columns – in other words instead of SELECT * FROM table1 WHERE col_n = x you may only need to return a couple of columns like SELECT col_1, col_2 FROM table1 WHERE col_n = x in which case it could be worth it to include col_1 and col_2 in the col_n index. That way SQL Server would not need to go to the table at all but instead get all it needs from the index pages. In certain scenarios where you have a rarely updated but very frequently queried table the above approach of including other columns in the col_n index may make sense even if the query returns all the columns.

Tuesday, November 1, 2016

SQL Split String Function (STRING_SPLIT in 2016)

* originally published in our old blog in August 2011 - updated with SQL Server 2016 reference

As a SQL Server developer you are often faced with the need to split a string of values that may be separated by comma, space, tab, or any other separator. In 2011 we published a simple table-valued function (SplitString see below) that takes a string and a divider as parameters and returns a table containing the values into a list form (one value for each row). The parameters are defined as a varchar(1024) for the string of values and char(1) for the divider but you can change those based on your needs.

As of SQL Server 2016 a new function STRING_SPLIT ( string , separator )  was introduced that does the same thing. So if you are using SQL Server 2016 use the available STRING_SPLIT function (you can read more about it here: https://msdn.microsoft.com/en-us/library/mt684588.aspx).
However, if you are using an older version of SQL Server you can take advantage of our SplitString function:
CREATE FUNCTION SplitString 
(
    @SeparatedValues VARCHAR(1024),
    @Divider CHAR(1)
)
RETURNS    @ListOfValues TABLE ([value] VARCHAR(50))
AS  BEGIN 
      DECLARE @DividerPos1 int, @DividerPos2 int
      SET @DividerPos1 = 1
      SET @DividerPos2 = CHARINDEX(@Divider, @SeparatedValues, 0)

     WHILE @DividerPos2 > 0
           BEGIN 
                  INSERT INTO @ListOfValues VALUES (SUBSTRING(@SeparatedValues, @DividerPos1, @DividerPos2 - @DividerPos1))
                  SET @DividerPos1 = @DividerPos2 + 1
                  SET @DividerPos2 = CHARINDEX(@Divider, @SeparatedValues, @DividerPos1)
            END
           -- Now get the last value if there is onw
                  IF @DividerPos1 <= LEN(@SeparatedValues) 
                       INSERT INTO @ListOfValues VALUES (SUBSTRING(@SeparatedValues, @DividerPos1, LEN(@SeparatedValues) - @DividerPos1 + 1))

        RETURN
  END
GO
Once you create the function you can call it like this:
SELECT * FROM [SplitString] (@mystring, @myseparator)


or with hardcoded values (in this example the separator is a vertical line):
SELECT * FROM [SplitString] ('value1|value2|value3', '|')


This will return:
   value1
   value2
   value3
 
Note that if the string starts with a divider like '|value1|value2|value3' then the first value returned will be a blank value.

You can of course insert those values directly into a table either via INSERT INTO <mytable> ... SELECT * FROM [SplitString]... or into a temp table via SELECT * INTO #mytemptable...FROM...