Wednesday, March 24, 2021

Data Compare for SQL Server - Column Mapping Workaround

When you need to compare and synchronize data in two databases, in most cases, the schemas of the databases in question are the same, so Data Compare for SQL Server automatically pairs the tables and maps the columns based on names. However, there are cases when you might need to compare data in two tables with different names and different column names.

Data Compare for SQL Server provides the facility that allows you to map two tables with each other regardless of the table names, but the columns are automatically paired and there is no direct way to pair two columns with different names. Fortunately, there is a quick and easy workaround to this problem. Since xSQL Data Compare allows you to compare and synchronize SQL Server views as well you can do the following:
  1. Create two views (one for each table you wish to compare) with identical alias column names 
  2. Compare and synchronize those two views instead – the columns will be mapped automatically since they have the same names but the updates during the synchronization will happen on the underlying columns which have different names.
A couple of limitations to be aware of:
  • Since SQL Server does not support SET IDENTITY_INSERT ON|OFF on views, the insert statements might fail if one of the view’s underlying tables contains an identity column. 
  • Data Compare cannot synchronize views that contain large binary fields such as varbinary(max) and image, or views with large text field such as varchar(max), nvarchar(max), text and ntext.

Download Data Compare for SQL Server now and try for yourself. 

Monday, March 22, 2021

How to automate the deployment of t-sql scripts

Following is a request we received from a client (verbatim): 
I need to automate the execution of t-sql scripts (multiple t-sql scripts in order). Schedule the execution if possible on one or more databases. For example: I have the following scripts:
   1.sql : create tables
   2.sql : data insertion
   3.sql : security role creation, access rights, etc.
I need to run those scripts, in sequence, on the DEV, TEST and PROD sql server instances

Script Executor was specifically designed to handle scenarios like this, in fact this is one of the simplest t-sql script deployment scenarios that our clients use Script Executor for. Here is how you can easily handle this: 

  1. Launch Script Executor and click on File / New Project
  2. On the “Databases” panel on the left side right click on “All Databases” and then click on “Add Databases…” and add all three databases DEV, TEST and PROD to that database group. Of course you can rename the database group and create new database groups. In a more complex deployment scenario you might want to create different database groups for development, test and production databases. 
  3. Click on the “Scripts” tab on the left panel , right click on “All Scripts” and then click on “Add Scripts…”  and add the scripts you wish to deploy. You can easily order the scripts by right clicking on a script and then moving that script up or down in the sequence. 
  4. Next go to Package / Configure… - Script Executor will perform an automated mapping of Database Groups to Script Containers (see the screen shot below). You can then easily tweak the mapping based on your needs.  
  5. Now if this is an on-demand deployment you can utilize the GUI to execute the package. Script Executor will execute each script against each database the script is mapped to and on completion you will see a detailed deployment report. You will also be able to browse through the result sets if one or more of those scripts returned any rows. 
  6. If you wish to automate this t-sql script deployment, that is schedule it to happen at a certain time then you have two options:
    1. You have Script Executor installed on the machine from which you will do the deployment. In this case you can do the following:
      1. Save the script deployment project
      2. Create a batch file that invokes the Script Executor command line to execute the project
      3. Use Windows Task Scheduler to schedule the execution of the batch file. 
    2. You don’t have Script Executor installed on the machine from which you will do the deployment. In this case you can go to Execute / Build Executable… to build a ready to deploy executable package that embeds all the target database information as well as the t-sql scripts you wish to deploy. You can then put that executable package on the machine from which you will do the deployment and you are ready to go. Use Windows Task scheduler to schedule the execution of this executable package and you are done.


Script Executor is the most powerful and robust t-sql script deployment tool in the market – it can handle any script deployment scenario you might have at a very low cost. The ability to wrap t-sql scripts in a ready to deploy executable eliminates the need for purchasing multiple licenses and makes it easy to deploy to remote client sites. In addition of SQL Server versions from SQL Server 2000 to SQL Server 2019, Script Executor also supports MySQL and DB2 and SQL Server Compact Edition.
Download the free, fully functional trial from: https://www.xsql.com/download/script-executor

Monday, March 1, 2021

One-click database compare - comparison sessions

All fours xSQL Software's database compare tools, Schema Compare for SQL Server, Data Compare for SQL Server, Schema Compare for Oracle, and Data Compare for Oracle, come with an awesome feature called "comparison sessions". So, what are comparison sessions and how do they help you? 

When you first compare two databases, whether it is two Oracle databases or two SQL Server databases, and whether you are comparing the schemas or the data, depending on the complexity of your scenario, the default tool settings may not satisfy your requirements and hence, you may need to spend some time configuring everything right, for example, if you are comparing a development database to a production database comparing and synchronizing permissions may not make sense so you want to exclude those, you may have a set of test tables on development that you do not want in the production, when comparing data you may want to chose a comparison key other than the primary key, etc. This can sometimes be an elaborate effort requiring hours to get everything just right and the last thing you want is to have to repeat that process the next time around. That is where the comparison sessions come in - every choice you make is automatically stored into a session that you can name, and a "tile" will be displayed on the workspace for each session. 

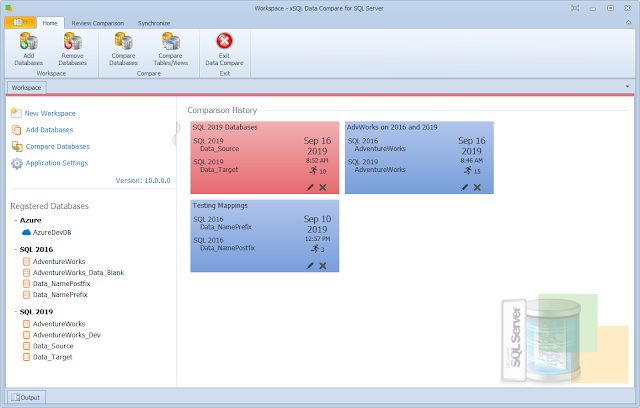
Each session tile shows the session name, the names of the two databases participating in the comparison, the last time that comparison was executed, and the number of times that comparison has been executed. 

You can change the color of the tiles and add a description for each session. Up to 100 comparison sessions can be stored in a workspace. By default the session tiles are ordered based on the "last execution date" but you can change the order in the "Application Settings".

Once a session has been saved you can simply click on the tile to run the comparison - just one click. 

You can download the SQL Server compare tools here and the Oracle compare tools here

Wednesday, February 24, 2021

Free Silver Subscription when you buy Comparison Bundle for Oracle - today only

Do you use both Oracle and SQL Server? If yes, this is the deal for you: purchase a license for the Comparison Bundle for Oracle today (Feb24, 2021) and we will send you a free 1-year Silver Subscription. The Comparison Bundle for Oracle includes Schema Compare for Oracle  and Data Compare for Oracle, whereas the Silver Subscription includes Schema Compare for SQL Server, Data Compare for SQL Server, Script Executor, and RSS Reporter

To take advantage of this offer:

Note that the discount code will subtract $1 from the price you pay for the Comparison Bundle for Oracle and, upon receipt of the order we will send you a complimentary license for the Silver Subscription. 

If you have any questions please email sales@xsql.com 

Note: this deal expires on 2/25/2021 at 00:00 - US Eastern Time. 

Monday, February 22, 2021

Schema Compare for Oracle - Identical but Different Columns

When comparing the schemas of two Oracle Databases using the Schema Compare for Oracle, sometimes you may see "strange" comparison results, that is, you may see that two tables that appear to be identical to each other have been marked as different, or the other way around, two tables that you know have differences may have been marked as equal. We will explain those two scenarios below. 

Marked as different but they seem to be identical! So, you see a table pair marked as different and click on the pair to review the schema differences. On the "Schema Differences" tab on the bottom you may notices that one or more columns have been highlighted as being different but there is no visible difference on the script! In these cases you will need to dig deeper to find out why those columns are marked as different. To do that expand the table on the top section and then click on the column you are interested on - on the bottom section of the screen you will see the script for that particular column with the different section highlighted. This difference will be visible on the table script as well however it is a lot easier to "spot" on the column script. Differences on default constraints, check constraints, default bindings, rule bindings, or extended properties can cause the columns to be flagged as different.

Marked as equal but they are different! The highlighting of the differences on the script of an object is controlled by the comparison engine so if the comparison engine marks two objects as equal then nothing will be highlighted on the scripts of those objects even though there might be visible differences on the script. Why does this happen? The answer lies in the comparison options - there are a few options related to collation, nullability, replication, identity etc. that affect the column comparison. So if you have, for example, chosen to ignore the column collation then even though the column on the left might have a different collation from that on the right the columns will be marked as equal and therefore the collation difference on the script will not be highlighted.

Download Schema Compare for Oracle now and try it for yourself. 

Wednesday, February 17, 2021

Data Compare for Oracle - Where Clause

Comparing data between two databases sounds simple and conceptually is very simple - basically you compare a data element from database 1 with the corresponding data element from table 2. However, the goal is to compare ALL data in database 1 with all data in database 2 and that is where things get complicated very quickly. Let's take a simple scenario, assume we just need to compare DB1.Table1 to DB2.Table1. Let's further assume that DB1.Table1 contains ~10 million rows and DB2.Table1 contains approximately the same amount of rows. In order to compare the data in those two tables, Data Compare for Oracle needs to transfer ~20 million rows (~10 million from each side) from the servers where those databases are hosted into the machine that is performing the data compare. As you can imagine this is an expensive operation that takes significant amount of time. 

Now, in most common scenarios you know that over 90% of those rows are going to be the same and you don't really need to compare them, so if you could avoid transferring all those rows and comparing them, you would save significant amount of time and resources. To accomplish that, Data Compare for Oracle provides a "where clause" option that allows you to compare only the rows you want. When defining the where clause, by default, the same filter is applied to both tables. If you wish to apply a different filters for each of the tables, you can un-check "Use the same where clause" and define a separate clause for each side. 

Important notes to keep in mind:
  1. Do not include the "where" keyword in the where clause. Simply enter the SQL condition, in the same way you would write it in any Oracle tools.
  2. Validate the where clause before comparing the data. This ensures that the clause is syntactically correct.
  3. We strongly recommend basing the where clause on the columns participating in the comparison key. You may include additional columns, but all data key columns must be included in the where clause. Not having a data key column could produce false missing records during the comparison.
Download the Data Compare for Oracle and try now. 

Tuesday, February 16, 2021

Data Compare for Oracle - Comparison Keys

The Data Compare for Oracle is designed to compare the data in "matching" rows in two tables that may be in two different databases or even the same database. What does "matching" rows mean? Matching rows means rows from both tables, that can be uniquely paired to each other based on the value of a certain column or a combination of columns. 

The most common scenario is that in which you would pair the rows from both sides based on the value of the Primary Key. This works great when you are comparing tables from identical or similar schemas / databases, but that is not always the case. Regardless, after pairing the tables (either automatically or manually), the Data Compare for Oracle analyses the tables and tries to identify an identical unique key that exist on both tables. The unique key can be the Primary Key, a Unique Constraint or a Unique Index. If it finds one, that is the key that will be used to pair the rows to each other, and if it does not find one it marks the table pair as un-comparable. Whether a useful comparison key was automatically identified or not you can still drill down on that table pair and either pick a different comparison key from the list of identified unique keys, or create a custom comparison key


When you drill down on a table pair you will see a window with 3 tabs one of which is called "Unique Keys". The "Unique Keys" tab is divided in two main sections - the top section contains two boxes with the list of unique keys that are potential candidates to be used as the comparison key for each table in the pair, whereas, the bottom section contains a box with the pair of unique keys that have been selected as the key to be used for the data comparison operation.

If the key that has been selected is what you want then you may proceed. However, you can also pick one of the other keys or,  create a custom key based on one or more columns of the table. Note that, a user-defined key or a custom key exists only inside data compare. No index or constraint is created on the Oracle table.

Data Compare picks the comparison key in the following order:
  1. User-Defined Key
  2. Primary Key
  3. Unique Constraint (the 1st in alpha order)
  4. Unique Index (the 1st in alpha order)
A user-defined key or a custom key always take precedence over the primary key, unique constraints or unique indexes that might exist on a table. When custom keys are selected, you should validate them by clicking on the Validate button. Custom keys are validated as following:
  • Columns in the custom keys must have the same name.
  • Columns in the custom keys must have the same data type. Length, scale, precision, nullability and other column properties are not considered.
  • The uniqueness of the key is checked only if the option “Check custom key uniqueness”, in the Application Settings form, is on.
To select a key for data comparison, simply double-click on it.

Download Data Compare for Oracle and try now. 

Thursday, February 11, 2021

Data Compare for Oracle - Mapping Rules

In most common data compare scenarios, the default mapping mechanism employed by Data Compare for Oracle, pairs the tables and views based on the name. However, there are often scenarios in which tables and views in both databases being compared may have slightly different names. Of course, as explained here, you can manually pair any two tables or views regardless of their names but that requires a lot of effort and makes sense when the names are completely different. In cases when, let's say, you may have table names in database1 prefixed with prefix1_ whereas the equivalent tables on database2 prefixed with prefix2_, you can utilize the mapping rules to make your job easier.  Mapping rules allow you to automate the pairing of those tables by creating simple rules. 


The Mapping Rules can be accessed from the ribbon or from the action links on the right panel of the comparison tab. There are two basic rules you can set, "Ignore prefix" and "Ignore postfix". For example if you wish to map prefix1_employees from database1 to employees table from database2 then you just enter "prefix1_"  in the "Source table prefix" textbox - that will cause the "prefix1_" part of the table name to be ignored in database1 and map the tables only based on the part of the name that comes after that part. Similarly, you can ignore a prefix on the other database, so you could easily have prefix1_employees table mapped to prefix2_employees table. You can do the same thing with "postfixes", so you could map employee_postfix1 to employee_postfix2. This is a small feature but comes in very handy in certain scenarios.  

Download Data Compare for Oracle and try today - it comes with a 3 week free trial. 


Tuesday, February 9, 2021

Data Compare for Oracle - Custom Table Mapping

The default behavior of xSQL Software's Data Compare for Oracle has been carefully designed to minimize the need for user intervention in most common cases. Generally, the most common data compare scenario involves two databases with identical or at least similar schemas (same tables and views), therefore, when you click on "compare databases" (in the case of Oracle the button is actually "Compare Schemas"), after you select the two databases/schemas to be compared, the tool will automatically map (pair) the tables and views based on the name. 

However, there are cases when you may need to compare data between two databases that do not share the same schema. That is, you want to compare the data in two tables with different names, and those tables may be in the same schema/database or in different schemas/databases. In this case, instead of clicking on "Compare Schemas" you would click on "Compare Tables/Views" - that invokes the manual mapping / pairing functionality that allows you to pair any two tables regardless of their name. 

The mapping process is very simple: 

  • click on "Compare Tables/Views" button on the "Home" tab of the ribbon. 
  • On the "Object Compare" dialog window that appears first select the Oracle connections and schemas on which the objects reside (you can choose the same database / schema on both sides if necessary)
  • When there is a large number of objects you may wish to specify a pattern for the name of the objects you are looking for (ex. all tables that start with a) - that will make it easier for you to find the tables/views you wish to compare. 
  • Once you have made your selections, click on the "Read Database Objects" link. Data Compare for Oracle will read objects on each schema and populate the two left bottom windows with the list of tables / views available.
  • Now you can map those tables/views one at a time irrespective of the names. Select an object on the left, then select an object on the right and click the left to right "arrow" button to map those two objects.

NOTE: In order to compare the Oracle views you will need to check the data comparison option "Compare and Synchronize Views". Keep in mind that Oracle imposes limitations on views and not all views are updatable. Also be aware of the fact that updating views means updating the underlying tables so use this option with caution.

Download Data Compare for Oracle and try today. 


Monday, February 8, 2021

Schema Compare for Oracle - a great version control tool

The name Schema Compare for Oracle clearly conveys the essence of the tool, the core functionality that this tool provides is that of comparing two Oracle database schemas. However, the fact that this same tool can provide one of the most effective ways to implementing database version control and change tracking capability is not obvious. So, how does the Schema Compare for Oracle make the leap from a schema compare tool to a database version control tool?  

First, let's clarify the phrase "database version control", what is it? Much like the code version control that every developer is familiar with, the goal of the database version control mechanism is to ensure that there is a reliable, unquestionable, source of the history of database schema changes that allows one to both identify any schema changes that may have happened between two versions and allow you to easily go back and forth between versions.  

Proceed with caution! In the case of databases, migrating the database schema from one version to another, whether you are moving to a new version of the database or reverting to an older version may cause loss of data because columns or whole tables that contain data in the current version but may not exist at all (and hence will be dropped) in the target version. 

Schema Compare for Oracle includes a cool feature: it allows you to take schema snapshots, small footprint, read-only files that contain 100% of the schema information. What does that mean? The schema snapshot is a frozen-in-time "picture" of your database (no data, just the schema). Furthermore, the included command line utility allows you to automate the process of taking the schema snapshots. 


How can you utilize the schema snapshots for database version control and change tracking? Schema Compare for Oracle allows you to compare any two schema snapshots, or any snapshot to a live database, and generate a target compliant synchronization script. Consider the following scenarios:

Scenario 1: you have taken nightly schema snapshots of your database and stored those into a repository. Now you are asked to identify the schema changes that happened between date1 and date2. All you would need to do is pick the right snapshot files from the repository based on those dates and compare them to see the differences. 

Scenario 2: you have stored the snapshots as in scenario 1. The request is to revert the database schema to where it was 2 days ago. In this case you take the snapshot from two days ago and compare it to your live database. Then generate the sync script to make the live database the same as the snapshot. You review the change script, especially the warnings section at the top to see if any data loss may occur in which case you would need take the appropriate steps to preserve that data. Then you execute the sync script and voila, your database schema has been reverted to the 2-days ago version. 

Scenario 3: The request this time is to propagate the latest schema changes to the production database. As in scenario 2 above, you pick the right snapshot from the repository (that is the latest stable - ready to ne published version) and compare that to your production database. Generate the sync script to make the production database the same as the snapshot in question. Take the same precautions described above to ensure no data is lost, and then execute the script. 

Download the Schema Compare for Oracle now.