Wednesday, February 24, 2021

Free Silver Subscription when you buy Comparison Bundle for Oracle - today only

Do you use both Oracle and SQL Server? If yes, this is the deal for you: purchase a license for the Comparison Bundle for Oracle today (Feb24, 2021) and we will send you a free 1-year Silver Subscription. The Comparison Bundle for Oracle includes Schema Compare for Oracle  and Data Compare for Oracle, whereas the Silver Subscription includes Schema Compare for SQL Server, Data Compare for SQL Server, Script Executor, and RSS Reporter

To take advantage of this offer:

Note that the discount code will subtract $1 from the price you pay for the Comparison Bundle for Oracle and, upon receipt of the order we will send you a complimentary license for the Silver Subscription. 

If you have any questions please email sales@xsql.com 

Note: this deal expires on 2/25/2021 at 00:00 - US Eastern Time. 

Monday, February 22, 2021

Schema Compare for Oracle - Identical but Different Columns

When comparing the schemas of two Oracle Databases using the Schema Compare for Oracle, sometimes you may see "strange" comparison results, that is, you may see that two tables that appear to be identical to each other have been marked as different, or the other way around, two tables that you know have differences may have been marked as equal. We will explain those two scenarios below. 

Marked as different but they seem to be identical! So, you see a table pair marked as different and click on the pair to review the schema differences. On the "Schema Differences" tab on the bottom you may notices that one or more columns have been highlighted as being different but there is no visible difference on the script! In these cases you will need to dig deeper to find out why those columns are marked as different. To do that expand the table on the top section and then click on the column you are interested on - on the bottom section of the screen you will see the script for that particular column with the different section highlighted. This difference will be visible on the table script as well however it is a lot easier to "spot" on the column script. Differences on default constraints, check constraints, default bindings, rule bindings, or extended properties can cause the columns to be flagged as different.

Marked as equal but they are different! The highlighting of the differences on the script of an object is controlled by the comparison engine so if the comparison engine marks two objects as equal then nothing will be highlighted on the scripts of those objects even though there might be visible differences on the script. Why does this happen? The answer lies in the comparison options - there are a few options related to collation, nullability, replication, identity etc. that affect the column comparison. So if you have, for example, chosen to ignore the column collation then even though the column on the left might have a different collation from that on the right the columns will be marked as equal and therefore the collation difference on the script will not be highlighted.

Download Schema Compare for Oracle now and try it for yourself. 

Wednesday, February 17, 2021

Data Compare for Oracle - Where Clause

Comparing data between two databases sounds simple and conceptually is very simple - basically you compare a data element from database 1 with the corresponding data element from table 2. However, the goal is to compare ALL data in database 1 with all data in database 2 and that is where things get complicated very quickly. Let's take a simple scenario, assume we just need to compare DB1.Table1 to DB2.Table1. Let's further assume that DB1.Table1 contains ~10 million rows and DB2.Table1 contains approximately the same amount of rows. In order to compare the data in those two tables, Data Compare for Oracle needs to transfer ~20 million rows (~10 million from each side) from the servers where those databases are hosted into the machine that is performing the data compare. As you can imagine this is an expensive operation that takes significant amount of time. 

Now, in most common scenarios you know that over 90% of those rows are going to be the same and you don't really need to compare them, so if you could avoid transferring all those rows and comparing them, you would save significant amount of time and resources. To accomplish that, Data Compare for Oracle provides a "where clause" option that allows you to compare only the rows you want. When defining the where clause, by default, the same filter is applied to both tables. If you wish to apply a different filters for each of the tables, you can un-check "Use the same where clause" and define a separate clause for each side. 

Important notes to keep in mind:
  1. Do not include the "where" keyword in the where clause. Simply enter the SQL condition, in the same way you would write it in any Oracle tools.
  2. Validate the where clause before comparing the data. This ensures that the clause is syntactically correct.
  3. We strongly recommend basing the where clause on the columns participating in the comparison key. You may include additional columns, but all data key columns must be included in the where clause. Not having a data key column could produce false missing records during the comparison.
Download the Data Compare for Oracle and try now. 

Tuesday, February 16, 2021

Data Compare for Oracle - Comparison Keys

The Data Compare for Oracle is designed to compare the data in "matching" rows in two tables that may be in two different databases or even the same database. What does "matching" rows mean? Matching rows means rows from both tables, that can be uniquely paired to each other based on the value of a certain column or a combination of columns. 

The most common scenario is that in which you would pair the rows from both sides based on the value of the Primary Key. This works great when you are comparing tables from identical or similar schemas / databases, but that is not always the case. Regardless, after pairing the tables (either automatically or manually), the Data Compare for Oracle analyses the tables and tries to identify an identical unique key that exist on both tables. The unique key can be the Primary Key, a Unique Constraint or a Unique Index. If it finds one, that is the key that will be used to pair the rows to each other, and if it does not find one it marks the table pair as un-comparable. Whether a useful comparison key was automatically identified or not you can still drill down on that table pair and either pick a different comparison key from the list of identified unique keys, or create a custom comparison key


When you drill down on a table pair you will see a window with 3 tabs one of which is called "Unique Keys". The "Unique Keys" tab is divided in two main sections - the top section contains two boxes with the list of unique keys that are potential candidates to be used as the comparison key for each table in the pair, whereas, the bottom section contains a box with the pair of unique keys that have been selected as the key to be used for the data comparison operation.

If the key that has been selected is what you want then you may proceed. However, you can also pick one of the other keys or,  create a custom key based on one or more columns of the table. Note that, a user-defined key or a custom key exists only inside data compare. No index or constraint is created on the Oracle table.

Data Compare picks the comparison key in the following order:
  1. User-Defined Key
  2. Primary Key
  3. Unique Constraint (the 1st in alpha order)
  4. Unique Index (the 1st in alpha order)
A user-defined key or a custom key always take precedence over the primary key, unique constraints or unique indexes that might exist on a table. When custom keys are selected, you should validate them by clicking on the Validate button. Custom keys are validated as following:
  • Columns in the custom keys must have the same name.
  • Columns in the custom keys must have the same data type. Length, scale, precision, nullability and other column properties are not considered.
  • The uniqueness of the key is checked only if the option “Check custom key uniqueness”, in the Application Settings form, is on.
To select a key for data comparison, simply double-click on it.

Download Data Compare for Oracle and try now. 

Thursday, February 11, 2021

Data Compare for Oracle - Mapping Rules

In most common data compare scenarios, the default mapping mechanism employed by Data Compare for Oracle, pairs the tables and views based on the name. However, there are often scenarios in which tables and views in both databases being compared may have slightly different names. Of course, as explained here, you can manually pair any two tables or views regardless of their names but that requires a lot of effort and makes sense when the names are completely different. In cases when, let's say, you may have table names in database1 prefixed with prefix1_ whereas the equivalent tables on database2 prefixed with prefix2_, you can utilize the mapping rules to make your job easier.  Mapping rules allow you to automate the pairing of those tables by creating simple rules. 


The Mapping Rules can be accessed from the ribbon or from the action links on the right panel of the comparison tab. There are two basic rules you can set, "Ignore prefix" and "Ignore postfix". For example if you wish to map prefix1_employees from database1 to employees table from database2 then you just enter "prefix1_"  in the "Source table prefix" textbox - that will cause the "prefix1_" part of the table name to be ignored in database1 and map the tables only based on the part of the name that comes after that part. Similarly, you can ignore a prefix on the other database, so you could easily have prefix1_employees table mapped to prefix2_employees table. You can do the same thing with "postfixes", so you could map employee_postfix1 to employee_postfix2. This is a small feature but comes in very handy in certain scenarios.  

Download Data Compare for Oracle and try today - it comes with a 3 week free trial. 


Tuesday, February 9, 2021

Data Compare for Oracle - Custom Table Mapping

The default behavior of xSQL Software's Data Compare for Oracle has been carefully designed to minimize the need for user intervention in most common cases. Generally, the most common data compare scenario involves two databases with identical or at least similar schemas (same tables and views), therefore, when you click on "compare databases" (in the case of Oracle the button is actually "Compare Schemas"), after you select the two databases/schemas to be compared, the tool will automatically map (pair) the tables and views based on the name. 

However, there are cases when you may need to compare data between two databases that do not share the same schema. That is, you want to compare the data in two tables with different names, and those tables may be in the same schema/database or in different schemas/databases. In this case, instead of clicking on "Compare Schemas" you would click on "Compare Tables/Views" - that invokes the manual mapping / pairing functionality that allows you to pair any two tables regardless of their name. 

The mapping process is very simple: 

  • click on "Compare Tables/Views" button on the "Home" tab of the ribbon. 
  • On the "Object Compare" dialog window that appears first select the Oracle connections and schemas on which the objects reside (you can choose the same database / schema on both sides if necessary)
  • When there is a large number of objects you may wish to specify a pattern for the name of the objects you are looking for (ex. all tables that start with a) - that will make it easier for you to find the tables/views you wish to compare. 
  • Once you have made your selections, click on the "Read Database Objects" link. Data Compare for Oracle will read objects on each schema and populate the two left bottom windows with the list of tables / views available.
  • Now you can map those tables/views one at a time irrespective of the names. Select an object on the left, then select an object on the right and click the left to right "arrow" button to map those two objects.

NOTE: In order to compare the Oracle views you will need to check the data comparison option "Compare and Synchronize Views". Keep in mind that Oracle imposes limitations on views and not all views are updatable. Also be aware of the fact that updating views means updating the underlying tables so use this option with caution.

Download Data Compare for Oracle and try today. 


Monday, February 8, 2021

Schema Compare for Oracle - a great version control tool

The name Schema Compare for Oracle clearly conveys the essence of the tool, the core functionality that this tool provides is that of comparing two Oracle database schemas. However, the fact that this same tool can provide one of the most effective ways to implementing database version control and change tracking capability is not obvious. So, how does the Schema Compare for Oracle make the leap from a schema compare tool to a database version control tool?  

First, let's clarify the phrase "database version control", what is it? Much like the code version control that every developer is familiar with, the goal of the database version control mechanism is to ensure that there is a reliable, unquestionable, source of the history of database schema changes that allows one to both identify any schema changes that may have happened between two versions and allow you to easily go back and forth between versions.  

Proceed with caution! In the case of databases, migrating the database schema from one version to another, whether you are moving to a new version of the database or reverting to an older version may cause loss of data because columns or whole tables that contain data in the current version but may not exist at all (and hence will be dropped) in the target version. 

Schema Compare for Oracle includes a cool feature: it allows you to take schema snapshots, small footprint, read-only files that contain 100% of the schema information. What does that mean? The schema snapshot is a frozen-in-time "picture" of your database (no data, just the schema). Furthermore, the included command line utility allows you to automate the process of taking the schema snapshots. 


How can you utilize the schema snapshots for database version control and change tracking? Schema Compare for Oracle allows you to compare any two schema snapshots, or any snapshot to a live database, and generate a target compliant synchronization script. Consider the following scenarios:

Scenario 1: you have taken nightly schema snapshots of your database and stored those into a repository. Now you are asked to identify the schema changes that happened between date1 and date2. All you would need to do is pick the right snapshot files from the repository based on those dates and compare them to see the differences. 

Scenario 2: you have stored the snapshots as in scenario 1. The request is to revert the database schema to where it was 2 days ago. In this case you take the snapshot from two days ago and compare it to your live database. Then generate the sync script to make the live database the same as the snapshot. You review the change script, especially the warnings section at the top to see if any data loss may occur in which case you would need take the appropriate steps to preserve that data. Then you execute the sync script and voila, your database schema has been reverted to the 2-days ago version. 

Scenario 3: The request this time is to propagate the latest schema changes to the production database. As in scenario 2 above, you pick the right snapshot from the repository (that is the latest stable - ready to ne published version) and compare that to your production database. Generate the sync script to make the production database the same as the snapshot in question. Take the same precautions described above to ensure no data is lost, and then execute the script. 

Download the Schema Compare for Oracle now. 

Friday, February 5, 2021

How does xSQL Profiler work

xSQL Profiler uses the same underlying technology as Microsoft SQL Server Profiler and adds additional capabilities such as:

  • ability to execute the same trace on multiple SQL Server instances simultaneously.
  • powerful filtering allowing the user to define precise traces that capture exactly what the user wants, nothing more and nothing less.
  • advanced scheduling 
Furthermore, the installation of xSQL Profiler is very simple and does not require any agent on the servers that you want to monitor. You just install xSQL Profiler on your monitoring machine and you can monitor any server to which you can connect to using either SQL Server authentication or Windows authentication.

Trace Structure

The diagram below illustrates how a trace defined in xSQL Profiler is structured. At the lowest level we have the SQL Server events that are defined by SQL Server such as “RPC:Starting” or “Lock:Cancel”. On top of these low level events xSQL Profiler defines its own events called “xSQL Profiler Events”. xSQL Profiler includes some common events, but the full power of it relies on the ability to allow the user to fine tune them or define completely new events. 


xSQL Profiler events can be defined by:
  • Selecting the underlying SQL Server events that you want to monitor.
  • Selecting the columns that you're interested in.
  • Defining filters to get only the results you need. 
For example to define a xSQL Profiler event to monitor DELETE statements, you can select the “RPC:Starting” and “SP:Starting” events and apply a filter on the TextData column similar to “TextData LIKE ‘%DELETE%FROM%’”.

When you want to actually monitor some of your servers, you define a trace. The elements of a trace include:
  • xSQL Profiler events that you will include in the trace.
  • Servers and/or databases you want to monitor.
  • Additional filters on the selected events. For example, if you're interested only in delete statements on the "USERS" tables you will include a filter on the TextData column to get only those results.
You can start and stop the trace manually or you can schedule it to automatically start and stop at specified interval

When the trace is started the necessary SQL traces will be created on each selected server and the data will be automatically loaded in the xSQL Profiler central storage.

Trace Data

As explained above, xSQL Profiler uses the standard SQL Server trace technology to gather the trace result. The diagram below illustrates how this works.

When the trace is started (by the user or by the scheduler) the necessary traces will be created on all servers included in the trace. In this case “Trace 1” will be created on both “Server 1” and “Server 2”. When the trace is running the results are logged on temporary files on each server. At regular intervals (or when the user selects the “Load Data” from the menu) the data is imported from the temporary data files to the Temp database on the remote servers. In this case the corresponding data will be loaded on the Temp database of “Server 1” and the Temp database of the “Server 2”. From the Temp database on each remote server the data are automatically transferred to the “xSQL Profiler Central Storage”. 
During this process the regular expression filters are applied and only the necessary data are moved to the central storage database.

xSQL Profiler supports all editions of SQL Server including MSDE and SQL Server Express. Download the Profiler now and try for yourself. 

Thursday, February 4, 2021

Customizing database deployment package - xSQL Builder

xSQL Software's Builder for SQL Server is designed to automate the database deployment to clients that cannot access the "master" database. The Builder accomplishes that goal by embedding a database schema snapshot in the deployment package and then comparing that snapshot to the target when the deployment package is executed on the client. The process is easy and straight forward, but, every scenario has its own particulars and despite the customizations that the Builder interface allows, it cannot address all of those scenarios. 

Therefore, together with the self-contained database deployment package, the Builder for SQL Server also provides the source code for that package. xSQL Builder uses a set of template files to generate the executable package. The template files are written in C# and contain the code that compares and synchronizes the client database with the imbedded master database (note that only the schema of the master database is imbedded in the deployment package, not the whole database). When you download the xSQL Builder the download package also includes a VS.NET 2015 C# project that you can run or modify as needed.

When you generate an executable package, the xSQL Builder package configuration wizard performs the following actions:

  • Copies the configuration files and the master database snapshot to the \Resources subfolder under the main folder of the code template.
  • Compiles all the template files with extension .cs and generates the executable package. Only the .cs files in the main folder are compiled. Files that are located in subfolders are ignored.

You can choose to run the code template from the VS.NET and get the same result as you would get by running the executable. 

To run the code template project in VS.NET do the followings:
  • Add references to the builder runtime dll. You can find these dll in the xSQL builder installation folder usually under \Program Files\xSQL Software\xSQL Builder
  • Add the files config.xml and the master database snapshot file in the VS.NET project. Both files are located in the \Resources sub-folder. In the VS.NET property window, set the "Build Action" property to "Embedded Resource" for both files.
The xSQL Builder template project requires the following dlls:
  • xSQL.Builder.Core.dll
  • xSQL.Utils.dll
  • xSQL.Schema.Core.dll
  • xSQL.Schema.SqlServer.dll
  • xSQL.SchemaCompare.SqlServer.dll
  • xSQL.Licensing.v4.dll
  • c1.c1zip.dll
All the dll-s are located in the Builder installation folder, usually under \Program Files (x86)\xSQL Software\Builder v<n>\ where n is the version number.

Download xSQL Builder now and try. 

Wednesday, February 3, 2021

Scripting a database object in .NET using Schema Compare SDK

In addition of allowing you to take schema snapshots, compare, and synchronize the schemas of two SQL Server databases, Schema Compare SDK for SQL Server also allows you to easily generate the T-SQL script for any object. The script can be of the type CREATE, DROP, ALTER (if ALTER is supported for the given object type) or a combination of those. 

Here's how easy it is to generate the script in your code:

using xSQL.Schema.Core;
using xSQL.Schema.SqlServer;
using xSQL.SchemaCompare.SqlServer;

namespace xSQL.Sdk.SchemaCompare.Examples
{
    class Scripting
    {
        /// <summary>
        /// This method reads the schema of the database AdventureWorks and scripts the table Employee.
        /// </summary>
        public static void Script()
        {
            SqlServer server;
            SqlDatabase database;
            SqlTable table;
            ScriptingOptions options;
            try
            {
                //--create the SQL Server object
                server = new SqlServer(@"(local)");

                //--create the database object
                database = server.GetDatabase("AdventureWorks");

                //--attach an event handler to database.SchemaOperation event in order to get progress information during the schema read
                database.SchemaOperation += new EventHandler<SchemaOperationEventArgs>(database_SchemaOperation);

                //--read the database schema
                database.ReadSchema();

                //--create scripting options;
                options = new ScriptingOptions();
                options.CreateScript = true;
                options.DropScript = false;
                options.AlterScript = false;

                //--locate and script the Employee table
                table = database.SqlTables["HumanResources", "Employee"];
                if (table != null)
                    Console.Write(table.GetScript(options));
            }
            catch (Exception ex)
            {
                Console.WriteLine(ex.ToString());
            }
        }

        private static void database_SchemaOperation(object sender, SchemaOperationEventArgs e)
        {
            //--exclude verbose messages
            if (e.Message.MessageType != OperationMessageTypeEnum.Verbose)
                Console.WriteLine(e.Message.Text);
        }

    }
}

Download Schema Compare SDK now and try this. 

SQL Server SUBSTRING

The Substring function, one of the most used string manipulation functions in all languages, is also available in SQL Server. Just like any function, the SQL Server Substring function takes some arguments in a specific order and returns a value. 

As you can easily guess from the name, the SQL Server Substring function returns a specific part of a given string, and that means it takes a string as an argument and returns part of that string. The question is which part of the original string will it return? That is specified by the other two arguments, the start position (start) of the sub-string to be returned and the number of characters to return (length).

So the function looks like this: SUBSTRING ( OriginalString, start, length )

For example, if we have a string like 'My preferred city in US is Boston' and we wish to extract the name of the city from that string we can write 

SUBSTRING (‘My preferred city in US is Boston’, 28, 6) 

and we would get back the substring ‘Boston’.

As you can imagine the name of the city in the above string can be anything and you do not necessarily know the length, so how can you make sure the substring function will extract the full name of the city from the original string and nothing else? 

Let us assume you know the city name starts at position 28 and it is the last word on the original string, so basically you just want to make sure you return everything from position 28 to the end. You also know that the city name cannot be longer than say 100 characters so you could do:

SUBSTRING ( OriginalString, 28, 100 )

What will this return when the OriginalString is 'My preferred city in US is New York'? Will this return an error since the 'length' we have specified goes outside the boundaries of the OriginalString? No, it will not return an error. If the “start + length” exceeds the length of the OriginalString than the SUBSTRING function will return everything from the start position to the end of the OriginalString. 

However, even though this would work, is not satisfying. It just does not feel right to pass an argument that we know it will be out of range. So, how do we fix that? How about this:

SUBSTRING ( OriginalString, 28, LEN ( OriginalString ) - 28 + 1 )

Let’s review this: as you can see we are using LEN ( OriginalString ) - 28 + 1 to specify the length argument of the Substring function. What does that expression do? It calculates the exact length of the city name (assuming the city name is everything from position 28 to the end of the OriginalString). LEN is a T-SQL function that will return the length of the argument we pass to it, in this case the length of the OriginalString. So if the OriginalString is 'My preferred city in US is New York' then LEN(OriginalString) will return the value 35. Knowing that the city name starts in position 28 we now know that the name of the city in this case would be exactly (35 - 28 + 1) = 8 characters long. So, the SUBSTRING expression above would be the equivalent of writing SUBSTRING ( OriginalString, 28, 8), but we have parametrized it so that it works for any city name regardless of its length. 

Now, let us make this slightly more interesting. Assume your original string contains the city name but it is somewhere in the middle of the OriginalString and you need to extract it. You review the data and notice that the city name is always preceded by the string 'city of ' and is always followed by ' has'. How can we pull out the city name? How about this:

SELECT SUBSTRING ( @OriginalString, CHARINDEX ( 'city of', @OriginalString ) + 8, CHARINDEX ( ' has', @OriginalString, CHARINDEX ('city of', @OriginalString ) ) - ( CHARINDEX ( 'city of', @OriginalString ) + 8 ) )

This may seem convoluted, but it is very simple:

  • The CHARINDEX ( 'city of', @OriginalString ) will return the starting position of the string 'city of'' and since we can count that ‘city of’ contains 7 characters and is followed by a space before the city name appears then we know that the starting position for the city name is CHARINDEX ( 'city of', @OriginalString ) + 8
  • The other expression is calculating the length of the city name. Now, we know that the city name is followed by ‘ has’ however, if we use CHARINDEX ( ' has', @OriginalString) that will return the starting position of the very first ‘ has’ in the original string (there may be more than one ‘ has’ in the original string)  and that is now what we want. We want the starting position of the ‘ has’ immediately after the city name, hence, we say find the starting position of ' has' but don’t look at the whole OriginalString, start looking after the 'city of'
Try this:

DECLARE @OriginalString varchar(1024)
SET @OriginalString = 'The crime rate in the city of New York has increased significantly'

SELECT SUBSTRING ( @OriginalString, CHARINDEX('city of', @OriginalString) + 8, CHARINDEX(' has', @OriginalString, CHARINDEX('city of', @OriginalString)) - (CHARINDEX('city of', @OriginalString) + 8))


Tuesday, February 2, 2021

How does xSQL Builder work?

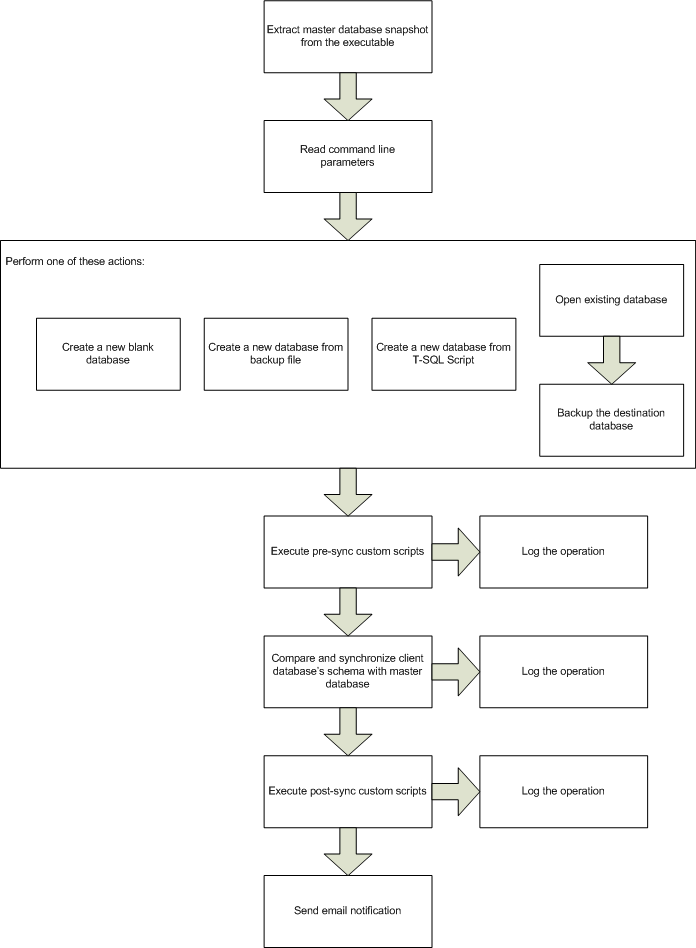
The main idea behind xSQL Builder is the automation of the deployment of database changes to multiple clients. How does the Builder it accomplish that goal? In one sentence: it generates a self-contained executable that propagates the schema of a master database to the clients on which it's executed. As the above sentence implies, there are two big parts to this:

1. Generating the self-contained executable package. The following diagram illustrates the actions that the Builder performs when generating the ready-to-deploy executable package. All the actions shown on the diagram are performed as the user goes step by step through the wizard. Most actions are self-explanatory but the "update .NET template project" may not be obvious. Together with the executable package, the Builder also generates a .NET project that contains the source code that will run on the client machine. The purpose of the project is to allow you to modify the code if necessary and then generate the executable - this allows you to customize the deployment package beyond the standard customization provided by the wizard. 


2. Executing the package. The following diagram illustrates the actions performed on the client. 


Download xSQL Builder now and see for yourself how it makes deploying database changes to clients easy, safe and efficient. 

What is xSQL's Builder for SQL Server?

The easiest way to explain what xSQL Software's Builder for SQL Server would be to list some of the key challenges that anyone who has ever shipped database driven software to clients is familiar with.

  • Most likely access to the client databases that need to be upgraded is not available - the client has to perform the upgrade on his own;
  • The "master" or "reference" database that you want to push out to the clients may not be reachable from the clients' machines;
  • Your clients don't necessarily upgrade in tandem - some clients may be three versions behind some two versions behind etc. so you cannot push out a standard upgrade script for all;
  • You may have customized your solution for some clients and a standard upgrade path may result in those customizations being wiped out. Therefore, for certain clients you may need to run custom T-SQL scripts before and/or after synchronizing the client's database to the master database;
  • Generating a ready-to-deploy executable package for all your clients, instead of sql scripts that would be alien to many of your clients, is highly desirable;
  • Generate a package for your .NET deployment solution or other setup and deployment utilities so that the database upgrade is presented as an integral part of the software upgrade is also desirable;
  • Every situation is different so you need to be able to customize the deployment package before generating it;
  • Receiving a notifications via email when the database deployment package fails to complete all the tasks would be very helpful to you;
  • Logging all operations that are performed on the client machine during the package deployment is not only the prudent thing to do but it's a necessity.

Builder for SQL Server was designed specifically with those challenges in mind, providing a wizard based interface that allows you to create, fully customizable, self contained, ready-to-deploy executable packages. 


Download the Builder for SQL Server now. 

Monday, February 1, 2021

SQL Server Data Compare - comparing large databases

Comparing the data from two SQL Server databases is kind of like comparing two text files to each other, so it should be easy, right? No, it is not easy. The focus of this article is just one of the challenges - the size of the databases being compared. Here is what a data compare tool, like xSQL Software's Data Compare for SQL Server, should be able to do: 

  • In order to compare the data it first needs to pair the tables and views and determine what comparison key to use for each table/view in order to pair rows from both sides with each other
  • Next, read the data from both sides (imagine millions of rows on each table), compare the data and keep track of the differences
  • Display the data differences in an easy to navigate manner- the user wants to see what's different between Server1.Table1 and Server2.Table2. Again, remember we are talking potentially millions of rows for each table pair so just slapping a data-grid on a window is not going to cut it. 
  • Generate a synchronization script which can get to be very large if there are a lot of differences between the databases. 
  • Execute the synchronization script on the target database. Once again, if the script is very large, executing it on the target is not a trivial matter. 
Except for the pairing of the tables step which is not affected by how much data you have to compare, all the other items in the above list are challenging to handle since your resources are limited. Many data compare tools out there will quickly demonstrate this challenge - as soon as you try to compare two relatively large databases they will crash or just keep "spinning the wheel" forever. We have invested considerable amount of effort into designing and building a data compare tool that efficiently handles any size database, restricted only by the disc space available. Our data compare tool seamlessly serializes data into disc, loading the data into the main memory only if and when necessary, and executing the synchronization script against the target database in manageable chunks the size of which is configurable by the user. 

Furthermore, to ensure an efficient comparison, our Data Compare for SQL Server, allows you to both exclude certain columns from the comparison and use row filters to compare only rows that you want to compare (more on those later) thus significantly reducing the workload. 

Download our Data Compare for SQL Server today.